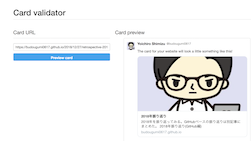
HugoでTwitter Card(アイキャッチ画像)を設定したときのメモ。

なお利用しているHugoのバージョンは以下。
$ hugo version
Hugo Static Site Generator v0.50/extended darwin/amd64 BuildDate: unknown
Themesは以下を利用している。
- Hugo-Octopress
TL;DR
- Hugo-Octopress ThemesでTwitterカードの画像(
twitterImage)を設定する - Hugoのもろもろの設定はGoの
text/templateのお作法を知っておく必要がある - Hugoの環境変数(?)を使ってルートディレクトリ直下の画像を使うようにした。
<meta name="twitter:image:src" content="{{ print $.Site.BaseURL . }}"/>
archetypes/post.mdを書いておけば既定のTwitter Cardのイメージとして設定しておける
Hugo-Octopress ThemesでTwitterカードの画像を設定する
Twitter CardとはTwitterにURLが貼られたとき、アイキャッチ画像やタイトルが展開されるように設定する機能のことだ。 Hugoは利用しているテーマごとに各設定の有効化方法が異なる。私のHugoはHugo-Octopressというテーマを使っているのでまずHugo-OctopressでどのようにTwitter Cardを有効化するのか確認する。
まずはREADMEに書いてあるとおり、config.yamlでTwitter Cardを有効化する。
budougumi0617/blog/config.toml
    # Twitter card config
    # Enable with this.
    twitterCardEnabled = true
    # Don't include the @.
    # twitterCardSite =
    twitterCardDomain = "budougumi0617.github.io"
    # Don't include the @.
    twitterCardAuthor = "budougumi0617"
次にTwitter Cardの画像イメージ(twitterImage)設定をする。READMEを確認すると、記事ごとに設定しないといけないらしい。
After Twitter card is enabled, you can add summary images to your posts in front matter with twitterImage: twitterImage: 02-fuzzer-crash.png
また、twitterImageは「記事と相対的な場所」に置かないといけないらしい。
Note: Image URL should be relative to the page, otherwise the final URL will not be correct. In short, image URL should be part of the page bundle. In this case, both index.md and 02-fuzzer-crash.png are in the same root directory. If the image is in a subdirectory of page bundle, it can be added like this: twitterImage: images/02-fuzzer-crash.png
私の場合、デフォルト用の画像を用意しておいてtwitterImageを設定したい。なので「ルートディレクトリからの絶対パス」で画像を指定したいのでこの設定を変更する。
custom_twitter_card.htmlを変更してtwitterImageの指定方法を上書きする。
Hugoではカスタムした設定ファイルを置いておけばThemesの設定ファイルを上書きできる。 Twitter Cardの設定はcustom_twitter_card.htmlで設定できる。Hugo-OctopressでtwitterImageを指定している部分のコードは以下。
...
  {{ with .Params.twitterImage }}
  <!-- Twitter summary card with large image must be at least 280x150px -->
    <meta name="twitter:card" content="summary_large_image"/>
    <meta name="twitter:image:src" content="{{ print $.Permalink . }}"/>
  {{ else }}
    <meta name="twitter:card" content="summary"/>
  {{ end }}
...
この中の{{ print $.Permalink . }}を変更するので、まずcustom_twitter_card.htmlをコピーして設定上書き用のファイルを作成する。
$ cp themes/Hugo-Octopress/layouts/partials/custom_twitter_card.html layouts/partials/
以下の変数の説明からPermalinkを確認すると、ページURLのことだとわかる。また、custom_twitter_card.htmlの記法はGoのtext/templateに則っている。
- Variables and Params
- text/template/
以上より{{ print $.Permalink . }}はページURLにtwitterImageに設定されている文字列を連結(fmt.Sprint)しているとわかるのでブログのベースURLから文字列を連結するように変更する。Variables and Paramsから確認すると、.Site.BaseURLでブログのベースURLが参照できるので、上書き用のcustom_twitter_card.htmlを以下のように変更した。
...
  {{ with .Params.twitterImage }}
  <!-- Twitter summary card with large image must be at least 280x150px -->
    <meta name="twitter:card" content="summary_large_image"/>
    <meta name="twitter:image:src" content="{{ print $.Site.BaseURL . }}"/>
  {{ else }}
    <meta name="twitter:card" content="summary"/>
  {{ end }}
...
あとは記事にtwitterImageを設定してstaticディレクトリ以下にtwitterImage用の画像を配置しておく。
- https://github.com/budougumi0617/blog/blob/master/content/post/2018/12/27/retrospective-2018.md
- https://github.com/budougumi0617/blog/tree/master/static
hugo serverコマンドでエラーが出ないか動作確認したあと、Web上のデータを更新する。Twitter Cardの確認には以下のサービスを利用することができる。
- Card validator
上記にtwitterImageを設定した記事のURLを入力し、きちんとtwitterImageが展開されることを確認する。

記事作成時にデフォルト設定としてtwitterImageを設定しておく
Hugoはarchetypes/post.mdを作っておけばhugo newコマンドで記事を新規作成したときのデフォルトデータを設定しておくことができる。archetypes/post.mdに以下を記述しておけばよい。
+++
...
author = "budougumi0617"
twitterImage = "twittercard.png"
+++
終わりに
実は以前にもTwitterCardの設定をしようと思っていたのだが挙動がよくわからず失敗していた。 その時点ではそもそもテーマに含まれていたcustom_twitter_card.htmlの記述が間違っていたので失敗していたらしい。久しぶりに再調査したら以下のコミットがされており、今回の変更方法にも気づくことができた。
   {{ with .Params.twitterImage }}
   <!-- Twitter summary card with large image must be at least 280x150px -->
     <meta name="twitter:card" content="summary_large_image"/>
-    <meta name="twitter:image:src" content="{{ index . 0 | absURL }}"/>
+    <meta name="twitter:image:src" content="{{ print $.Permalink . }}"/>
   {{ else }}
     <meta name="twitter:card" content="summary"/>
   {{ end }}
また、Card validatorというのがあるのを初めて知った。しばらくはこれでどうTwitter Cardが見えるのか投稿後確認しておく。
参考
- Hugo-Octopress
- Partial Templates | Hugo
- Variables and Params | Hugo
- text/template package
- Card validator